Simple Web Interface

Today, we will create a very simple Machine Translation (MT) Web Interface for OpenNMT-py, OpenNMT-tf and FairSeq models using CTranslate2 and Streamlit.

Previously, there were other tutorials on how to use a simple server and web interface with Flask. However, today’s tutorial is for those who want to create an ultra simple, quick demo.

We also aim at highlighting that CTranslate2 is now the way to go for serving OpenNMT models due to its exceptional performance. It is completely up to you to use it in a simple way like what we will do here, or to integrate it into a REST API for advanced uses.

So let’s start…


Table of Contents:


Install Requirements

Optional: Create and Activate a Virtual Environment

  • Install virtualenv:
pip3 install virtualenv
  • Create a virtual environment, e.g. myvenv:
virtualenv myvenv --python=python3
  • Activate the virtual environment:
source myvenv/web/bin/activate

Install Required Libraries

pip3 install ctranslate2 sentencepiece streamlit watchdog nltk

Convert Model to CTranslate2

CTranslate2 supports both OpenNMT-py and OpenNMT-tf models. As of version 2.0, it also supports FairSeq models. However, you need to convert your model to the CTranslate2 format before using it.

The following commands are simply copied from the CTranslate2 repository, and tested to make sure they are up-to-date. This example uses pre-trained Transformer English-German models. If you trained your own model, run the same commands on it instead.

For an OpenNMT-py model:

pip3 install OpenNMT-py

wget https://s3.amazonaws.com/opennmt-models/transformer-ende-wmt-pyOnmt.tar.gz
tar xf transformer-ende-wmt-pyOnmt.tar.gz

ct2-opennmt-py-converter --model_path averaged-10-epoch.pt --output_dir ende_ctranslate2

For an OpenNMT-tf model:

pip3 install OpenNMT-tf

wget https://s3.amazonaws.com/opennmt-models/averaged-ende-ckpt500k-v2.tar.gz
tar xf averaged-ende-ckpt500k-v2.tar.gz

ct2-opennmt-tf-converter --model_path averaged-ende-ckpt500k-v2 --output_dir ende_ctranslate2 \
    --src_vocab averaged-ende-ckpt500k-v2/wmtende.vocab \
    --tgt_vocab averaged-ende-ckpt500k-v2/wmtende.vocab \
    --model_type TransformerBase

For a FairSeq model:

ct2-fairseq-converter --model_path <model.pt> --data_dir <model_dir> --output_dir <output_dir>

Python sample:

Let’s make sure that CTranslate2 works properly in our setup by running this Python code:

import ctranslate2
translator = ctranslate2.Translator("ende_ctranslate2/")
translator.translate_batch([["▁H", "ello", "▁world", "!"]])

Note: translate_batch() can take a list of sentences and translate them in batches, which would be very efficient. Here we are using only one sentence as an example for demonstration purposes.

Create Your App

Test App

Let’s first create a small app to see how Streamlit works.

Create a file called test.py for example and add the following lines to it.

import streamlit as st

st.title("Upper My Text")

user_input = st.text_input("Write something and press Enter \
    to convert it to the UPPER case.")

if len(user_input) > 0:
    output = user_input.upper()
    st.info(output)

Launch your test app by opening the Terminal and running the following command.

streamlit run test.py

If everything works as expected, you should see something like this in your browser at the URL http://localhost:8501. Once you type a text and press Enter, the text will be printed in the UPPER case.


Translation App

Let’s now develop our translation web interface. Create a file called translate.py for example, and add the following to it.

import streamlit as st
import sentencepiece as spm
import ctranslate2
from nltk import sent_tokenize


def translate(source, translator, sp_source_model, sp_target_model):
    """Use CTranslate model to translate a sentence

    Args:
        source (str): Source sentences to translate
        translator (object): Object of Translator, with the CTranslate2 model
        sp_source_model (object): Object of SentencePieceProcessor, with the SentencePiece source model
        sp_target_model (object): Object of SentencePieceProcessor, with the SentencePiece target model
    Returns:
        Translation of the source text
    """

    source_sentences = sent_tokenize(source)
    source_tokenized = sp_source_model.encode(source_sentences, out_type=str)
    translations = translator.translate_batch(source_tokenized)
    translations = [translation[0]["tokens"] for translation in translations]
    translations_detokenized = sp_target_model.decode(translations)
    translation = " ".join(translations_detokenized)

    return translation


# [Modify] File paths here to the CTranslate2 SentencePiece models.
ct_model_path = "/path/to/the/ctranslate/model/directory"
sp_source_model_path = "/path/to/the/sentencepiece/source/model/file"
sp_target_model_path = "/path/to/the/sentencepiece/target/model/file"

# Create objects of CTranslate2 Translator and SentencePieceProcessor to load the models
translator = ctranslate2.Translator(ct_model_path, "cpu")    # or "cuda" for GPU
sp_source_model = spm.SentencePieceProcessor(sp_source_model_path)
sp_target_model = spm.SentencePieceProcessor(sp_target_model_path)


# Title for the page and nice icon
st.set_page_config(page_title="NMT", page_icon="🤖")
# Header
st.title("Translate")

# Form to add your items
with st.form("my_form"):
    # Textarea to type the source text.
    user_input = st.text_area("Source Text", max_chars=200)
    # Translate with CTranslate2 model
    translation = translate(user_input, translator, sp_source_model, sp_target_model)

    # Create a button
    submitted = st.form_submit_button("Translate")
    # If the button pressed, print the translation
    # Here, we use "st.info", but you can try "st.write", "st.code", or "st.success".
    if submitted:
        st.write("Translation")
        st.info(translation)

Note: Make sure you update the variables ct_model_path, sp_source_model_path, and sp_target_model_path with our own paths to the CTranslate2 model, and the SentencePiece source and target models.

Let’s launch our translator. Run the following command in the Terminal.

streamlit run translate.py

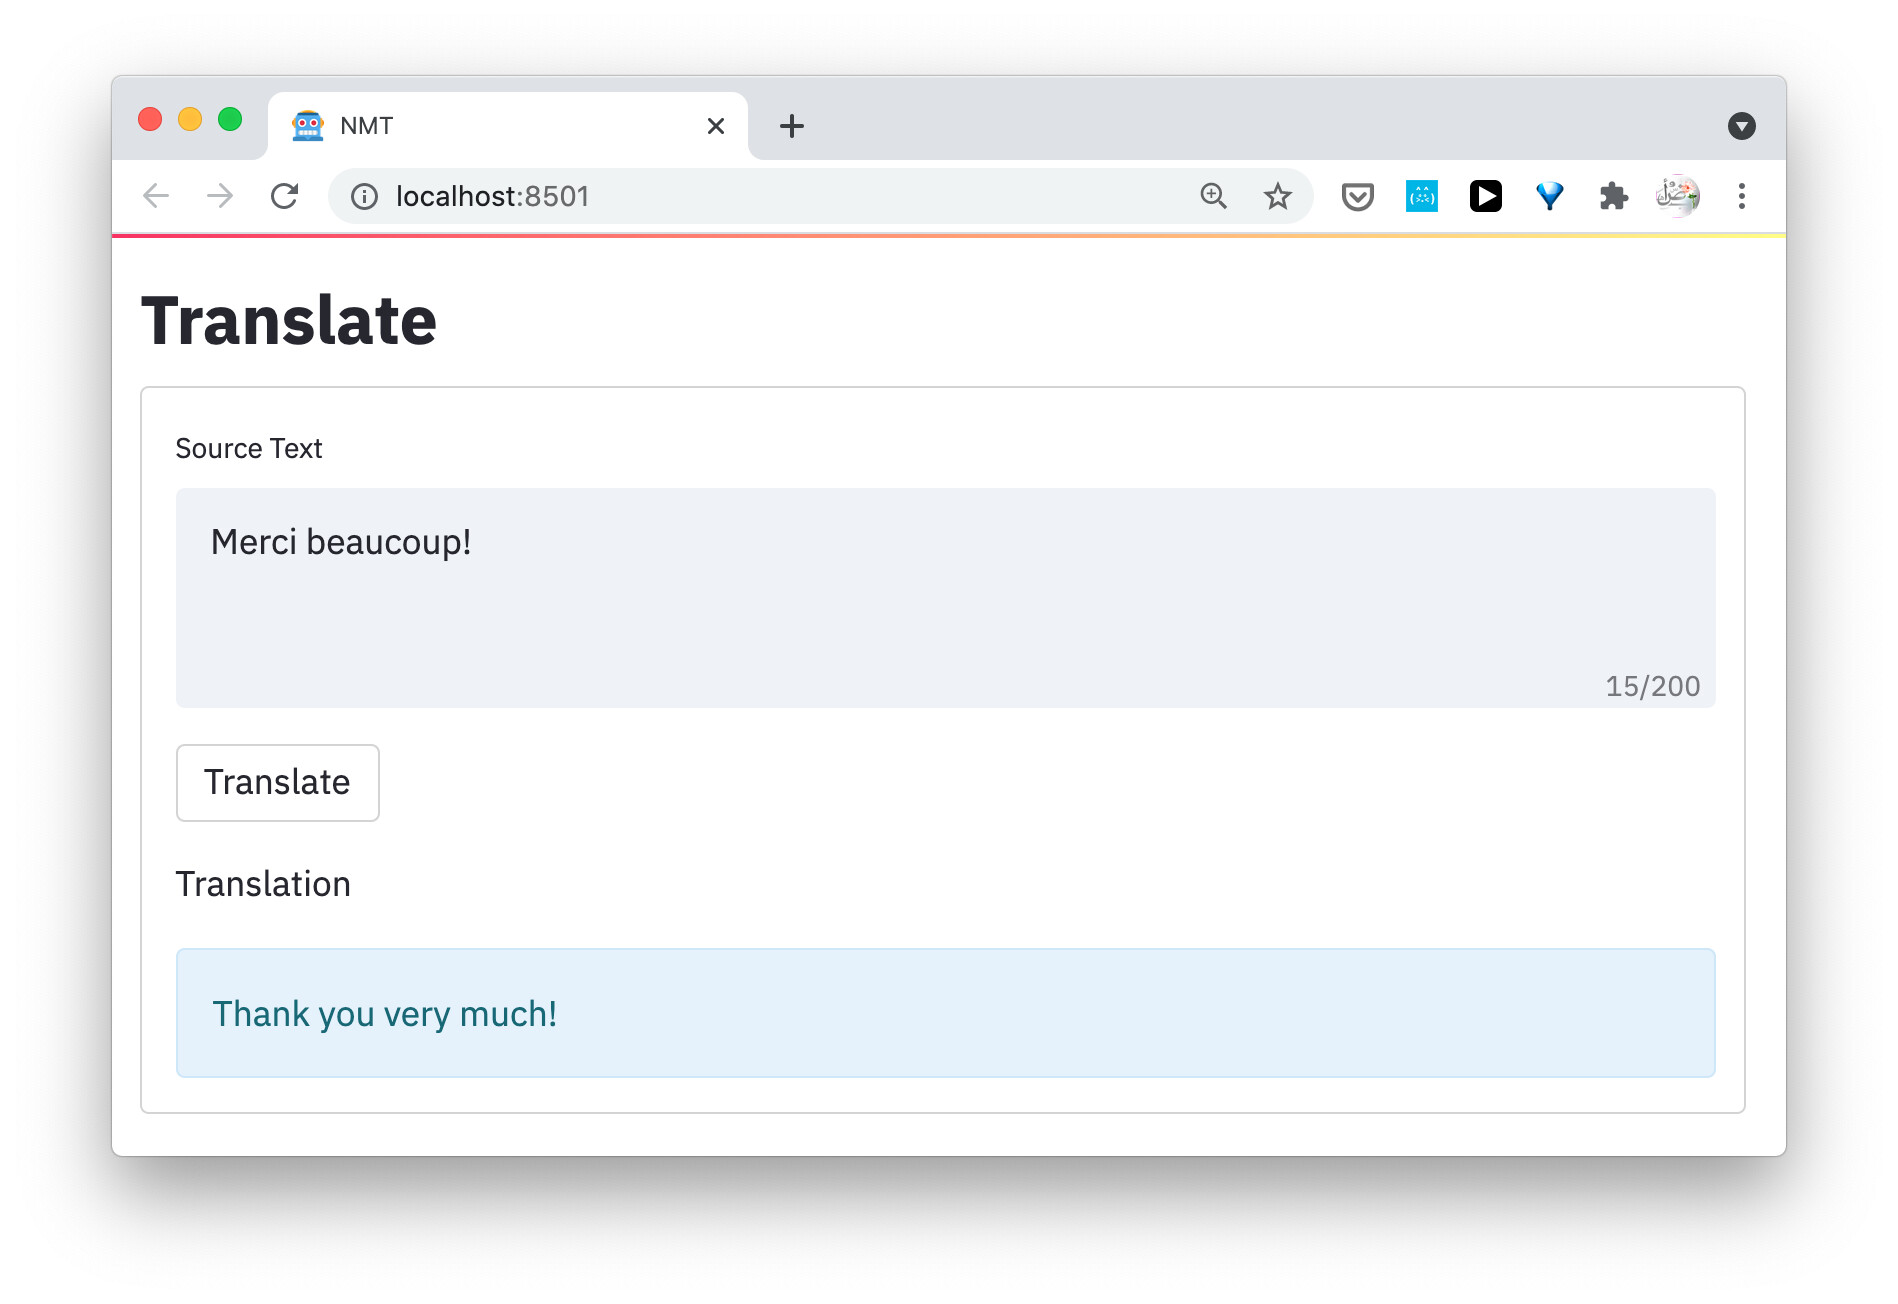
If everything works fine, you should see an output like this at the URL http://localhost:8501/

Try typing a sentence (in the same source language of your model) and press the button “Translate”. The translation should be printed as you see here!

I hope this helps. I will be updating this repository with Python samples.

11 Likes

Deployment: This app can be deployed to any hosting service, including Streemlit, PythonAnywhere, or Heroku.

When we use those hosting services… I guess there is no GPU? How is performation Ctranslate without GPU?

BTW, good job, i will certainly try your tutorial :slight_smile:

Dear Samuel,

If you mean Streemlit, PythonAnywhere, or Heroku, yes - they have CPUs only. Generally speaking, I would use these services for demonstration purposes only, as even the paid plans have limited resources. Still, you can determine your needs better.

That said, CTranslate2 is very fast even on a CPU. Even though there can be a difference if we calculate the translation time of the same model on GPU and CPU, sometimes this difference is hardly perceived by a user. I would say, even at the production level, it is safe to start deployment on CPUs with good specifications; they can still be more cost-effective than GPUs.

Important: If you translate multiple sentences or if you segment your input text into sentences, do not loop on them; instead, pass all of them as a list to translate_batch()

Kind regards,
Yasmin

3 Likes

ctranslate2 is lightning fast with CPU, even on my tiny Asus Zenbook!

You know, I was trying to figure out where I could install Ctranslate2 as it require Linux… and then I thought about my old Asus mini laptop (12 years olds) which is running on Linux Mint distro. And obviously, I thought about you that you probably came to the same conclusion because of the same “constraints”. I’m pretty sure your Asus zenbook > my Asus eepc. It was the first form of mini laptop.

https://en.wikipedia.org/wiki/Asus_Eee_PC

I am currently running ctranslate2 under WSLg (Windows Subsystem for Linux) with Ubuntu 20.04 as the Linux system. My Asus Zenbook has 8GB of RAM. Running Ubuntu 20.04 on top of Windows takes me up to 6.4 GB RAM and then running CT2 takes me to 6.5 GB. of RAM so I still have a bit free. You might just be lucky with your “old” Asus if you can cut out the bloat in your Linux distro.

I see, I had never heard about WSLg… I might consider this too.

Right now, I’m trying to use this tutorial with Heroku.

I might post some additional information as you need some extra step to plug the “app” into Heroku:

  • Procfile
  • setup.sh
  • Requirements.txt

Here the tutorial I found that complete the missing link:

Tutorial to use Heroku with an existing app in Git

1 Like

After few problems, I was finally able to make it work in Heroku.

Things important to know:

You need to use Heroku git, not your github account, because you won’t be able to load your model in there… (too big)

Second, you will need to add 3 files (its on a Linux server, so it’s cases sensitive for the name of the files):
Procfile:

web: sh setup.sh && streamlit run translate.py

requirements:

pathlib==1.0.1
streamlit==0.84.0
ctranslate2==2.2.0
sentencepiece==0.1.96

setup.sh

mkdir -p ~/.streamlit
echo "[server]
headless = true
port = $PORT
enableCORS = false
" > ~/.streamlit/config.toml

When you have created your “app” in Heroku and downloaded " Heroku CLI" follow the instruction provided on their webpage:

Even if you’re using Heroku git, you will still need to create a Git repo in your main folder, but make sure it’s not linked to one online. Heroku doesn’t support 2 git in the same repo.

You need to do the “git init” when you are located in the folder which contain the 3 files mentioned above and the “translate.py” file.

You also need to do few update to the translate.py:

ROOT_DIR = "/app/"
ct_model = os.path.join(ROOT_DIR, "path/to/the/ctranslate/model/directory")
sp_source_model = os.path.join(ROOT_DIR, "path/to/the/sentencepiece/source/model/sourcefile.model")
sp_target_model = os.path.join(ROOT_DIR, "path/to/the/sentencepiece/source/model/targetfile.model")

I really enjoy the result!

To deploy you have to those these 3 steps every time :

  • git add .
  • git commit -am “make it better - or what ever reason you are deploying!”
  • git push heroku master
    which are basic git steps…

If you had closed your console, you also need to reconnect to heroku… I believe.

1 Like

An additional comment: expect 1o to 25 sec to translate a bunch of sentences. I’m trying to figure out if I can buy a better package from Heroku to increase the CPU power, because this is too slow :frowning:

I’m using the free version at this time…

Dear Samuel,

First, thanks a lot for explaining how to run the tutorial on Heroku. In my opinion, it is good to be able to start it anyhow on a free plan, as the purpose of this tutorial is to help students demonstrate their work.

If you are planning to pay for more CPU power, consider something like AWS EC2, DigitalOcean, or maybe Google Cloud; see this tutorial, for example:

The reason why PythonAnywhere and Heroku cost more is that they save you a lot of technical hassle. However, for real work, you will have to eventually go for one of the aforementioned general-purpose services or something similar.

Obviously, it all depends on your needs.

Kind regards,
Yasmin

1 Like

Hi,

To improve the performance, I think the code should be updated to not recreate a Translator and a SentencePieceProcessor on each request.

2 Likes

Indeed. In my offline app these creations occur once as soon as the required translation model & SentencePiece model are known.

Thanks, Guillaume! So I updated the code a bit so that SentencePiece works on all the input sentences, not one by one.

I noticed that SentencePiece encode() and decoce() can take either one sentence (str) or a list of sentences (list). So this will still work:

sp = spm.SentencePieceProcessor(sp_source_model)
sentences = ["they liked it", "yes they did", "this is great"]
tokens = sp.encode(sentences, out_type=str)
print(tokens)

[[‘▁they’, ‘▁liked’, ‘▁it’],
[‘▁yes’, ‘▁they’, ‘▁did’],
[‘▁this’, ‘▁is’, ‘▁great’]]

sp = spm.SentencePieceProcessor(sp_target_model)
sentences  = sp.decode(tokens)
print(sentences)

[‘they liked it’, ‘yes they did’, ‘this is great’]

In Flask, I would load SentencePieceProcessor only once when the API starts. I will see how to achieve this in Streamlit to further improve the code.

Kind regards,
Yasmin

2 Likes

I made few adjustments… now after initial loading it’s nearly instant :slight_smile:

And I changed the default option of device to “auto” so it’s automatically choose… this might be part of the reason why it’s nearly instant. I have also added the option to display the predict score along with the translation.

import streamlit as st
import sentencepiece as spm
import ctranslate2
import os
import pathlib

ROOT_DIR = "/app/"
#os.path.dirname(os.path.abspath(__file__)) # This is your Project Root


def tokenize(text, sp):
    """Use SentencePiece model to tokenize a sentence

    Args:
        text (str): A sentence to tokenize
        sp (str): SentencePiece model object (should be source object)

    Returns:
        List of of tokens of the text.
    """

    tokens = sp.encode(text, out_type=str)
    return tokens


def detokenize(text, sp):
    """Use SentencePiece model to detokenize a sentence's list of tokens

    Args:
        text (list(str)): A sentence's list of tokens to detokenize
        sp (str): SentencePiece model object (should be target object)

    Returns:
        String of the detokenized text.
    """
    
    translation = sp.decode(text)
    return translation


def translate(source, translator, source_sp, target_sp, predict_score = False):
    """Use CTranslate model to translate a sentence

    Args:
        source (str): A source sentence to translate
        translator (object): Ctransalte2 object 
        source_sp: sentencePiece Object init with source model
        target_sp: sentencePiece Object init with target model
        predict_score: Indicate if you want the predict score outputted with the translation.

    Returns:
        Translation of the source text.
    """

    source_tokenized = tokenize(source, source_sp)
    translation_ob = translator.translate_batch([source_tokenized], return_scores=predict_score)
    translation = detokenize(translation_ob[0][0]["tokens"], target_sp)
    
    if (predict_score == True):
        translation = str(translation_ob[0][0]["score"]) + "|||" + translation

    return translation


# ct_model (str): The path to the CTranslate model
# sp_source_model (str): The path to the SentencePiece source model
# sp_target_model (str): The path to the SentencePiece target model
ct_model = os.path.join(ROOT_DIR, "path/to/the/ctranslate/model/directory")
sp_source_model = os.path.join(ROOT_DIR, "path/to/the/sentencepiece/source/model/sourcefile.model")
sp_target_model = os.path.join(ROOT_DIR, "path/to/the/sentencepiece/source/model/targetfile.model")

#init tokenizer / translator objects
#To handle multiple models you need to add some logic here in order to handle the init of the 3 object below.
source_sp = spm.SentencePieceProcessor(sp_source_model)
target_sp = spm.SentencePieceProcessor(sp_target_model)
#device is set to "auto" and will guess between "cpu" or "cuda" where cuda means to use GPU.. (you can change it to force ether one.)
#predict_score return the prediction score of the model if set to true.
translator = ctranslate2.Translator(ct_model, device='auto')

# Title for the page and nice icon
st.set_page_config(page_title="NMT", page_icon="🤖") #Ω
# Header
st.title("Translator")

# Form to add your items
with st.form("my_form"):

    # Textarea to type the source text.
    user_input = st.text_area("Source Text", max_chars=200)
    # Translate with CTranslate2 model
    translation = translate(user_input, translator, source_sp, target_sp, predict_score=True)

    # Create a button
    submitted = st.form_submit_button("Translate")
    # If the button pressed, print the translation
    # Here, we use "st.info", but you can try "st.write", "st.code", or "st.success".
    if submitted:
        st.write("Translation")
        st.info(translation)


# Optional Style
# Source: https://towardsdatascience.com/5-ways-to-customise-your-streamlit-ui-e914e458a17c
padding = 0
st.markdown(f""" <style>
    .reportview-container .main .block-container{{
        padding-top: {padding}rem;
        padding-right: {padding}rem;
        padding-left: {padding}rem;
        padding-bottom: {padding}rem;
    }} </style> """, unsafe_allow_html=True)


st.markdown(""" <style>
#MainMenu {visibility: hidden;}
footer {visibility: hidden;}
</style> """, unsafe_allow_html=True)

So after some research, I figured out that my initial fix was not preventing the reloading. It was by chance that it was loading quick after my code change.

here is the correct way to do it:

import streamlit as st
import sentencepiece as spm
import ctranslate2
import os
import pathlib

ROOT_DIR = "/app/"
#os.path.dirname(os.path.abspath(__file__)) # This is your Project Root


def tokenize(text, sp):
    """Use SentencePiece model to tokenize a sentence

    Args:
        text (str): A sentence to tokenize
        sp (str): SentencePiece model object (should be source object)

    Returns:
        List of of tokens of the text.
    """

    tokens = sp.encode(text, out_type=str)
    return tokens


def detokenize(text, sp):
    """Use SentencePiece model to detokenize a sentence's list of tokens

    Args:
        text (list(str)): A sentence's list of tokens to detokenize
        sp (str): SentencePiece model object (should be target object)

    Returns:
        String of the detokenized text.
    """
    
    translation = sp.decode(text)
    return translation


def translate(source, translator, source_sp, target_sp, predict_score = False):
    """Use CTranslate model to translate a sentence

    Args:
        source (str): A source sentence to translate
        translator (object): Ctransalte2 object 
        source_sp: sentencePiece Object init with source model
        target_sp: sentencePiece Object init with target model
        predict_score: Indicate if you want the predict score outputted with the translation.

    Returns:
        Translation of the source text.
    """

    source_tokenized = tokenize(source, source_sp)
    translation_ob = translator.translate_batch([source_tokenized], return_scores=predict_score)
    translation = detokenize(translation_ob[0][0]["tokens"], target_sp)
    
    if (predict_score == True):
        translation = str(translation_ob[0][0]["score"]) + "|||" + translation

    return translation

# Title for the page and nice icon
st.set_page_config(page_title="NMT", page_icon="🤖") #Ω

@st.cache(allow_output_mutation=True)
def load_models():
    # ct_model (str): The path to the CTranslate model
    # sp_source_model (str): The path to the SentencePiece source model
    # sp_target_model (str): The path to the SentencePiece target model
    ct_model = os.path.join(ROOT_DIR, "path/to/the/ctranslate/model/directory")
    sp_source_model = os.path.join(ROOT_DIR, "path/to/the/sentencepiece/source/model/sourcefile.model")
    sp_target_model = os.path.join(ROOT_DIR, "path/to/the/sentencepiece/source/model/targetfile.model")

    #init tokenizer / translator objects
    #To handle multiple models you need to add some logic here in order to handle the init of the 3 object below.
    source_sp = spm.SentencePieceProcessor(sp_source_model)
    target_sp = spm.SentencePieceProcessor(sp_target_model)
    #device is set to "auto" and will guess between "cpu" or "cuda" where cuda means to use GPU.. (you can change it to force ether one.)
    #predict_score return the prediction score of the model if set to true.
    translator = ctranslate2.Translator(ct_model, device='auto')
    return translator, source_sp, target_sp


# Header
st.title("Translator")

# Form to add your items
with st.form("my_form"):
    #get the models
    translator, source_sp, target_sp = load_models()

    # Textarea to type the source text.
    user_input = st.text_area("Source Text", max_chars=200)
    # Translate with CTranslate2 model
    translation = translate(user_input, translator, source_sp, target_sp, predict_score=True)

    # Create a button
    submitted = st.form_submit_button("Translate")
    # If the button pressed, print the translation
    # Here, we use "st.info", but you can try "st.write", "st.code", or "st.success".
    if submitted:
        st.write("Translation")
        st.info(translation)


# Optional Style
# Source: https://towardsdatascience.com/5-ways-to-customise-your-streamlit-ui-e914e458a17c
padding = 0
st.markdown(f""" <style>
    .reportview-container .main .block-container{{
        padding-top: {padding}rem;
        padding-right: {padding}rem;
        padding-left: {padding}rem;
        padding-bottom: {padding}rem;
    }} </style> """, unsafe_allow_html=True)


st.markdown(""" <style>
#MainMenu {visibility: hidden;}
footer {visibility: hidden;}
</style> """, unsafe_allow_html=True)
1 Like

Dear Samuel,

So, using Streamlist caching by adding @st.cache(allow_output_mutation=True) before the load_models() function helps avoid reloading the models with every new request. This makes sense. Many thanks for sharing!

Kind regards,
Yasmin

Here is an example of what I was able to do with some additional customization:

Which is really useful for translators to validate the model.

3 Likes

Great work, Samuel. I love the colour coding :slight_smile:

If anyone needs it… Its kinda of hard to find the right colours so that it’s readable and “nice” to see…

I used Color library to generate the gradient:

from colour import Color
green = Color("#56ff33")
colors = list(green.range_to(Color("#ff6e6e"),10))
print(colors)

which provided me this list of colours:
colorList = ["#56ff33", “#84ff3a”, “#aeff40”, “#d7ff47”, “#fcff4d”, “#ffdf54”, “#ffbf5a”, “#ffa161”, “#ff8667”, “#ff6e6e”]

the code for the color legend is :

#Colour legend
            st.write('Colours Legend')
            legend = '<div style="display: table;"><div style="display: table-row">'
            for color in colorList:
                if color == colorList[0]:
                    legendText = 'Machine is sure'
                elif color == colorList[len(colorList)-1]:
                    legendText = 'Machine is not so sure'
                else:
                    legendText = ' '
                legend = legend + '<div style="background-color: ' + color + '; padding: 4px 3px; display: table-cell; width: min-content;">' + legendText + '</div>'
            legend = legend + '</div></div>'
            st.markdown(legend, unsafe_allow_html=True)

For the implementation with the predict score… you need to build a custom formula that generate a score from 0 to 9 and then place the sentence in a with the coresponding index in the colour list.

something like this (I’m using dataframe, so just adjust it to your structure…):

'<span style="background-color: ' + colorList[int(min(round(abs(x['PredictScore']),0), len(colorList)-1))] + '">' + x['Target'] + '</span>'

in this case i’m using the predict score directly, but i’m going to change that to use the normalisez predict score option from ctranslate2. Otherwise, long sentence always comeout red.

1 Like